Sunday, 29 September 2013

Poppy Seed Bagels

Finished bagels!

I didn't realise how few ingredients bagels needed until I started researching recipes for them, there's no excuse not to try them as they're made with things you'll find in any vaguely well stocked baking cupboard.

The hardest thing I found to do was shape the bagels, the first one or two were slightly lumpy but I soon got the hang of it, practice makes perfect, which is the perfect excuse to make these time and time again! It is definitely a recipe I'll be going back to, next I'm thinking cinnamon and raisin bagels, but that's for another time!


Activated yeast


Poppy Seed Bagels


Makes 9

Ingredients:

450g bread flour
4tbsp sugar
2tsp salt
1 sachet dried yeast (7g)

Rough dough
2tbsp milk
2tbsp poppy seed


190oC fan oven/200oC other ovens

Method:

1. In a large bowl add 100ml of warm water to 1tbsp sugar and the sachet of yeast. Leave for 10 minutes to activate the yeast - you'll start to see bubbles appear on the surface of the liquid.

2. Add another 200ml of warm water to the bowl, followed by half the flour and the 2tsp salt. Mix into a dough, and add the rest of the flour in stages until you get a soft, but not sticky dough, you might not need all of the flour.

Smooth, kneaded dough

3. Turn the dough out on a lightly floured surface and knead gently for 10 minutes until the dough is smooth and elastic. (See this previous blog about the best kneading technique.)

4. Once smooth put the dough into an oiled bowl, covered with oiled cling film and leave in a warm place until doubled in size - approx. 1 hour, but don't be afraid to leave it for longer.

5. Turn the doubled dough out onto a lightly floured surface and cut into thirds and then thirds again to get nine equal portions. Knead each into a smooth circle and then roll between your palms to get a smooth ball.

Making the hole
6. Put a large ban of water onto boil and add the remaining 3tbsp sugar. Bring to a rapid boil.


7. Meanwhile, to make the bagel's characteristic hole press your thumb into the centre of each dough ball, then pick it up, work your other fingers into the space, making the hole bigger by gently pulling the dough outwards and cycling it around between your index fingers. Make the hole approx 3cm across. Repeat for all 9 dough balls.

8. Now your sugary water should be boiling, so add the bagels to the water (do as many in a go as you can fit in the pan without them touching each other or the sides), boil for 1 minute on each side and then remove from the water onto a wire rack with a slotted spoon.

Cycling between your fingers
9. Once you've boiled all of the bagels put the milk in a shallow dish and the poppy seeds in another. One at a time, place a bagel face down in the milk, and then straight into the poppy seeds. Place seeds face-up onto a lightly greased baking tray. Repeat for all of the bagels.

10. Bake in the middle of a preheated oven for 20-25 minutes, or until they're golden brown and sound hollow when tapped on the bottom.

11. Cool on a wire rack. These will keep for 3-4 days if kept in an airtight container, but they're best enjoyed whilst still warm from the oven with lashings of butter...

Boiling bagels!
The poppy seeds in this recipe are entirely optional; you can have plain bagels instead, simply glaze with a beaten egg before baking, or add any other seeds of your choice, again using milk as glue.

Like I said, I was really impressed with how simple these were, I can't wait to start experimenting with flavour combinations soon!

Happy Baking!

The Baking Ginger xx


Finished article!

Being topped


Ready for the oven

Wednesday, 25 September 2013

Chewy Chocolate and Nut Cookies

Baked and ready to be eaten!
I made these at the same time as the Salted Nutella Cookies and I've got to admit, I think I prefer these; I'm a big fan of nuts in anything...

The trick to making them really chewy is the light muscovado sugar, if you've only got white sugar that'll work too, your cookies just won't be so chewy and gooey!

They'd work really nicely for elevenses, as part of a spread for afternoon tea, or hot from the oven with loads of vanilla ice cream - yum!


Chewy Chocolate and Nut Cookies


Makes 20 large cookies

Ingredients


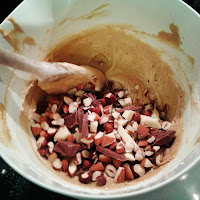
Mixture with nuts and chocolate

125g butter/marg
100g light muscovado sugar
125g caster sugar
1 egg
2tsp vanilla essence
225g self raising flour
small pinch of salt
100g chocolate pieces (I used white and milk chocolate)
100g nuts (I used chunks of almonds and hazelnuts)


170oC fan oven/180oC other ovens

Method


1. Cream the butter and sugar in a large mixing bowl until light and fluffy - once you think you've done give it another minute or so of beating to make your cookies as light as possible!

2. Beat in the egg and vanilla essence in two goes until it's all combined. If it curdles don't worry, it'll come back together when you add the flour.

Ready for the oven

3. Add the flour and salt, and mix until just combined then mix in the nuts and chocolate.

4. Put the mix in the freezer for 10 minutes or fridge for an hour just to make it easier to work with - it will be a very very sticky dough!

5. Once the dough is chilled, using two dessert spoons, put a walnut size ball of dough onto a lined baking sheet. Make sure the dough balls have at least 3 inches between them as they will spread massively whilst baking.

6. Bake in the middle of a preheated oven for 9 minutes; they may look raw in the middle still but they'll continue to cook as they cool and you'll end up with a gorgeous, chewy cookie once they've cooled on a wire rack - although as usual they're best when still warm from the oven!

Finished article!

I used the chocolate and nut combinations that I like, but the basic dough recipe can be adapted to suit your tastes, they're really flexible and once you've made one combination you'll really want to try others! You could add lemon zest to mixture to make the cookies fresh and bring out the flavour of the nuts, it really works, and would be great with other citrus fruits too!

They'll keep for 4-5 days in an airtight container.

Happy Baking!

The Baking Ginger xx


Salted Nutella Cookies

These are another bake I've invented based around Kate's love of Nutella...

They're dead easy - only 5 ingredients, no chilling time and a dozen gorgeous cookies at the end, what more could you ask for??

I only added the salt to half of the cookies, as it was a bit of an experiment, but it worked really well so I'd definitely recommend adding it to the top of each cookies, although if you're not keen they're still delish without!
Ready for the oven - they're so easy!


Salted Nutella Cookies


Makes 12

Ingredients

300g Nutella
2tbsp any sugar (brown sugar makes cookies chewier)
1 egg (beaten)
65g plain flour
50g chocolate chips (I used half white chocolate, half milk chocolate)

Optional: 12 small pinches of salt (sea salt flakes work best)

170oC fan oven/180oC all other ovens
Baked and ready for eating up!

Method


1. Combine all of the ingredients in a bowl and mix thoroughly until everything is incorporated.

2. Use your hands to roll walnut size pieces of dough into balls and squash down slightly onto a lined baking tray. Place the dough balls with at least 2 inches between them as they spread a lot whilst cooking.

3. If you're going to add salt, put a small pinch onto of each cookie now.

4. Bake in the centre of a preheated oven for 10 minutes - don't worry if they still look a bit raw in the middle when you take them out, this will mean they're gooey and chewy once they've cooled!

5. Leave to cool slightly, but these are definitely beset enjoyed warm out of the oven. If there's any left they'll keep for 2-3 days in an air tight container.

These are so easy, quick and delicious, you've really got to try them!

Happy Baking,

The Baking Ginger xx

Wednesday, 18 September 2013

Four Shades of Biscotti

Biscotti varieties
Biscotti is something I’ve wanted to make for a while, I’ve read a lot about it and it seems like a really versatile thing, which I decided to put to the test by making 4 varieties at once! These are really crispy biscuits because of their high sugar/low fat content, as well as the fact they're baked twice.

They were all delicious; white chocolate, almond and lemon was my favourite, but play around with what you like to find your favourite combinations. If you want to make all one type of biscotti quadruple the flavourings, or double if you want to make two flavours.

Flavour combinations


4 Shades of Biscotti 


Makes 30 portions (7/8 slices of each)

Ingredients:


12oz plain flour
1.5tsp baking powder
12oz caster sugar
4 eggs (beaten)
Dough coming together

-          Lemon, Almond and White Chocolate
o       zest of 1 lemon
o       2oz whole almonds
o       2oz white chocolate
-          Milk Chocolate and Hazelnut
o       2oz whole hazelnuts
o       2oz milk chocolate
o       1tsp vanilla essence
-          Pistachio, Blackberry and Orange
o       2oz pistachios shelled
o       2oz fresh blackberries
o       zest of 1/3 orange
-          Chocolate and Orange
Dough + flavourings
o       4oz plain chocolate
o       zest of 1 orange

150oC fan oven/160oC all other ovens

Method:


1. Mix together the flour, sugar and baking powder using your hands then add an egg at a time and bring the dough together with your hands. 


2. Divide the dough into four and work on a portion at a time, the dough is very soft and sticky so make sure you’ve got extra flour to hand to keep things moving. 
After first bake

3. For each type of biscotti add the additional ingredients and knead gently to incorporate. Shape into a log, put on a lined baking tray and put into the middle of a preheated oven for 30 minutes. Spread the biscotti out as they’ll spread as they cook. 

4. Repeat for each type of biscotti – you can do them simultaneously if you like; whatever you find easiest! N.B. The blackberry and pistachio flavourings make the dough very wet, so add a few more tbsp of flour to compensate. 

5. Once they’ve been in the oven for 30 minutes cool slightly on a wire rack (for approx. 30 minutes) then slice into 1-2cm thick slices, return to the baking tray and bake for another 5 minutes on each side (another 10 in total), or until golden brown. 
Ready for second bake

6. Cool on a wire rack, then serve with hot chocolate, coffee or tea – they’re perfect for elevenses as they're best dunked! They will keep for 3/4 days in an air tight container.

Versatile, delicious and very cute; they’d make a great present wrapped in shiny wrap paper and tied with ribbon or in a box with tissue paper – perfect!

Happy Baking, 

The Baking Ginger xx

Lemon, Almond and White Chocolate
Pistachio, Blackberry and Orange
Hazelnut and Milk Chocolate


Plain Chocolate and Orange


Monday, 16 September 2013

Ultimate Cheese Scones

I love cheese scones. Along with millionaires' shortbread they're my absolute favourite. 

One of the best things about being at home for a few days (aside from seeing family and friends!) is having well stocked cupboards, which meant I could rustle these up spontaneously on Saturday morning in time for elevenses. They're great hot out of the oven covered in real butter with a cup of strong coffee.


Ultimate Cheese Scones


Ingredients before assembly
Makes 12 big scones


Ingredients:

500g self raising flour
130g butter/marg
4tsp baking powder
2tsp mustard powder
250g mature cheddar
seasoning to taste
2 eggs
0.5 pint milk

170oC fan oven/180oC all other ovens

Dough ready to roll

Method:

1. Rub the butter into the flour until it resembles breadcrumbs. Add the baking powder, mustard powder, grated cheese (keep a small handful of the cheese back for topping the scones) and seasoning; combine.

2. Whisk the eggs and add milk to make up to 0.5 pints. Add 2/3 of the milk mixture to the dry ingredients and use your hands to combine into a soft dough. (You can add more of the milk mixture if it needs it, but don't make the dough too sticky or you'll spoil the texture of the finished scone.)

Topped before the oven
3. Roll the dough of gently on a lightly floured surface to 1in/2.5cm thick, cut with a 2.5/3in ring and place on a lined baking sheet. Repeat for rest of the dough until it's all used, then brush the tops of the scones with some of the remaining egg mix and top with a generous pinch of the remaining grated cheese.

4. Bake in the centre of a preheated oven for 15/20 minutes until the scones are golden and the sides don't feel soft when they're prodded.

These really are best enjoyed straight out of the oven. If you're going to keep them for a few days reheat them in the oven at 150oC for 10 minutes, or microwave for 30 seconds if you can't wait that long!
Finished scones!

If you want to pimp your scones add chopped chives, thyme, garlic granules or cayenne pepper, but I'm a bit of a purist when it comes to scones - if it ain't broke don't fix it!

These are a fab treat for the weekend, so get going!

Happy Baking,

The Baking Ginger xx


Saturday, 14 September 2013

Chilli Jam with Garlic and Ginger

Chilli Jam
This isn't technically baking, but oh well! This jam is based on Lorraine Pascal's Asian Chilli Jam recipe, but having make it before this time I've upped the chilli, garlic and ginger content to give it more of a kick.

It's great on toast, with cheese and biscuits, with salad or stirred through a stir fry. Or if you're feeling generous it makes a really cute present with a loaf of home made bread!

It keeps for a couple of months, but once opened keep in the fridge and eat within a month - which isn't difficult to do!


Chilli Jam with Garlic and Ginger


Before reduction

Makes 4 small pots, easy to divide or multiply as required

Ingredients:

900g tomatoes
6 medium chillis (roughly chopped - with seeds unless you'd like something more mellow)
6 cloves garlic (peeled and roughly chopped)
3cm ginger (peeled and roughly chopped, or 2tsp ginger paste)
500g granulated sugar
120g balsamic vinegar
seasoning to taste

Mid-reduction
4 small jam jars, cleaned and labels removed

Method:

1. Put all of the ingredients (apart from the sugar) in a food processor and blitz until all finely chopped.

2. Put into a pan with sugar and heat to a rolling boil. Boil for 25/30 minutes until it becomes syrupy and thick. To test it's consistency put a small spoonful on a plate, chill in the fridge for approx 5 minutes and then pull your finger through the jam; if it's a spreadable, jam-like consistency turn off the heat and leave to cool for 20 minutes, if not boil for another 5 minutes and test again.

Pouring jam into jars
3. Whilst the jam is cooling for 20 minutes put your jam jars in the oven at 130oC for 20 minutes to sterilise them.

4. Once the jam has cooled and the jars are sterilised ladle the jam into a jug and then pour it into the jars. Leave to cool for 10 minutes then put the lids on tight and leave to cool completely.

This jam is a great alternative to sweet chilli sauce, and you can make it as hot or mellow as you like by varying the chilli and chilli seed content.

It's a good place to start with jams and chutneys, so have a go!

Happy Baking,

The Baking Ginger xx


Friday, 6 September 2013

Easy Peasy Pizza with a Scone Base

Original recipe from school for a 7 year old!
The first time I made these pizzas I was in Year 3 at school - they're that easy! The scone base is a bit different to the usual bread base for a pizza, but it's a lot more flexible; you can add cheeses, garlic, herbs to your scone dough without risking upsetting anything!

Here I've added thyme to the base and topped it with lots of veg, cheddar and basil, but you can literally do anything with it; use up leftovers or go for a classic tomato, basil and mozzarella (I've included the quantities of toppings you'll need for that combo at the bottom).

This recipe will serve 2/3 generously, or 4 if you do an accompanying side salad, garlic bread or veg. They lend themselves really well to a sociable meal, make the bases in advance and then let people top their own individual pizzas, they're fun and tasty, what more could you ask for??

Flour and marg breadcrumbs

Easy Peasy Pizza with a Scone Base


Ingredients:

Base:
8oz self raising flour
2oz marg
100ml milk
salt and pepper
1tbsp fresh thyme (or any other herbs you fancy)

Veggie Supreme Toppings:
half tin chopped tinned tomatoes
Dough with thyme in
4oz grated cheddar
2tbsp sweetcorn
lightly sauted onions, peppers, courgettes (with garlic)
mushrooms
big handful of basil leaves

Tomato, Basil and Mozzarella Toppings:
half tin chopped tinned tomatoes
3 beef tomatoes
300g mozzarella (2 balls worth)
very large handful of basil

Other Suggested Toppings:
Smoked sausage, anchovies, olives, ham, tuna, jalapeƱos, 
pineapple, aubergine (fry before), cooked chicken, 
cooked prawns, smoked salmon, any types of cheese,
whole egg which cooks as the pizza does,
Rolled and ready to go

170oC fan oven/180oC all other ovens
standard size baking tray

Method:

1. In a large bowl rub the flour and marg together into breadcrumbs.

2. Add the baking powder, seasoning and any herbs/cheese you fancy.

Avec toppings
3. Add the milk to bring the ingredients together into a soft dough, turn out onto a floured surface and knead lightly just until the dough comes together.

4. Roll the dough out to a size slightly bigger than your baking tray, grease the baking tray with olive oil and carefully move the dough onto the baking tray - fold over the bits of dough that overhang to make edges for your pizza base.

5. Cover with the chopped tomatoes, toppings and then cheese as you like.

6. Bake in the centre of a preheated oven for 20 minutes, or until the cheese is melted and the edges of the base are golden brown.
Cooked and ready to eat!

They're best enjoyed straight out of the oven, or they're great cold for a picnic lunch, or even breakfast the next day!

These are so easy and flexible you can't not give them a go!

Happy Baking,

The Baking Ginger xx

Thursday, 5 September 2013

Lemon Drizzle Bundt Cake with Raspberries and Cream


Ripples from the Bundt Tin
Another variation on the theme of lemon and raspberry - it's a good one!

This was for my brother's birthday, it makes a good celebration cake because it looks as good as it tastes!

Bundt tins are a bit old school, but the cakes they make look really cute, and are perfect for filling with cream on special occasions, what's not to love??

If you haven't got a Bundt tin this would also work as a traybake, with the cream spread on top.


Lemon Drizzle Bundt Cake with Raspberries and Cream
Bundt Tin


Ingredients


Cake:
4oz self raising flour
4oz marg
4oz caster sugar
2 eggs
1tsp baking powder
1tbsp milk

Extras:
zest and juice of 3 lemons
Batters ready to go
3oz sugar
1tsp red/pink food colouring
150ml double cream
2tbsp icing sugar
150g raspberries plus extra to decorate

Bundt tin
170oC fan oven/180oC other ovens


Method

1. Put all the cake ingredients into a bowl and beat into a smooth batter. Add the lemon zest.

Marbling done!
2. Divide the batter equally between two bowls and add the food colouring to one - make it as bright a colour as you'd like, they fade when they're cooked so be bold!

3. Thoroughly grease the Bundt tin with marg (use kitchen roll to apply it, or your fingers) and fill with alternate spoonfuls of each batter to get the marbled pattern. You can also then drag a skewer or knife through your batter to make the marbling even more pronounced.

4. Bake in the centre of a hot oven for 15-20 minutes or until golden and coming away from the edge of the tin.

5. Leave to cool slightly before attempting to remove from the tin - tapping the bottom of the tin and gentle shaking are the best ways I've found to do this! Whilst it's cooling combine the juice from the lemons with the 3oz sugar in a small pan and heat until the sugar has dissolved.

Mid drizzle
6. Once your cake is out of the tin pour over the lemon juice and sugar - this is the drizzle part of the lemon drizzle. Leave the cake to cool completely. You can get to this point a day or so before you need the cake and keep it in an air tight container and then fill with cream just before serving.

7. When you're ready to eat the cake whip the cream to soft peaks, sieve in the icing sugar and smash up the raspberries before adding them too. Fill the centre of the cake with the cream and pile it high! Decorate with raspberries if you want to. (You can do this a couple of hours before eating - just keep it in a cool place afterwards)

Completed cake!


Like I said this cake is great for birthdays or celebrations but it'd make a really special dessert too, it's one of our new family favourites!

Happy Baking!

The Baking Ginger xx